Pot Trivet
Essentials
- Fabric: printed, or plain
- Wadding
Dimensions list
- · 1/3 of a yard of cotton fabric
- · 6 yards of 1/2" cotton piping
protect your surfaces from hot pots and plates with a handmade Trivet. This is an easy project and doesn't take very many supplies to make, plus they're pretty to look at. for supplies,
2 Next, sew your strips together. Place the ends, right sides together but at perpendicular angles and pin. You'll be sewing from corner to corner at this angle. You can use a fabric marker to make yourself a sewing line.
3 At your sewing machine, stitch with a regular length straight stitch to attach the two ends together and repeat the process until you have one long strip of fabric. Cut of the excess seam allowance after you sew your seam and press it open. I do a diagonal seam because it'll will be less noticeable.
4 Now You'll create your piping. Wrap your cotton piping inside your fabric so the right side of the fabric is on the outside. You can pin the edges if you want or you can just hold it with your hand and bring the edges together while sewing. On your sewing machine you'll want to use the zipper foot so you can stitch close enough to the piping. Sew a standard straight stitch unit the piping is completely enclosed.
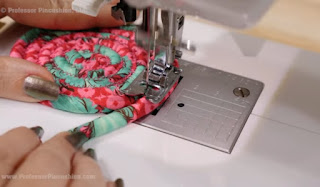
5 If you have extra fabric past the piping, just cut it off. After you finish sewing, trim off seam allowance, leaving only about 1/8" of an inch past the stitches. To create the Trivet shape, we'll be sewing the piping together in a swirl. Switch your sewing machine stitch to a zigzag . Straight it is the most difficult so do your best to create the shape.
6 If your sewing machine foot is slanted like this, it might not feed through easily, so use a piece of folded fabric to slip under the foot to even it out. Zigzag stitch attaching two piped edges together. You'll notice the larger your trivet gets, the easier sewing will become. If you get some slight wrinkles in your fabric, it's fine and will be hardly noticeable when finished. Make sure the seam allowances end up on the bottom. When you get close to finishing, pull back the fabric at the end and trim some of the piping only. At the end, merge the flat end of the piping to the wrong side and zigzag stitch over it.
7 This will give you a trivet about 8" in diameter. If you trivet has a slight curve, don't worry. Once you put something on top, like a pot, it'll flatten out. You can also use this same process to make smaller versions and make yourself coasters. This is a great way to use those fabric pieces that are too small for other projects.


Comments